Capturing a high-quality image is challenging through different cameras. But, getting a high quality photo online is even more challenging. Photos are the combinations of small pixels. So, it is very common to have low-resolution, grainy or noisy images from both camera and online. When a photo becomes blurry or grainy with a low resolution, it is called pixelated images. Pixelated images can be generated also when you resize the photo or just uploaded it on an online platform. Pixelated images are not good for high-quality content.
Working with pixelated photos can be tough but this is not unfixable. In this article, we will try to aid you to fix the pixelated photos in Photoshop.
What is pixelation?
Generally, pixelation occurs when displaying a bitmap image or a part of a bitmap image in large size. When that picture is enlarged, individual colored pixels become visible. Such types of images are called pixelated. Pixelation basically happens with a lower number of PPI or pixels per inch as well as a low bits-per-pixel rate.
In other words, if you take a small-sized image like 300 x 300px, you will see a smooth edge of the image. Now, if you resize that same picture by 1024 x 1024px, you will notice some pixel blocks come out. This happens because of the large size and lack of viewable sufficient data.
Pixelation can happen when you attempt to convert the low-quality photo into a high-quality photo.
Why Do Images Become Pixelated?
There are various reasons which are responsible for an image to be pixelated. Here are some relevant reasons:
- Resizing images is the most common reason. Resizing without technical resolution work results in an unclear and blurry image.
- This can happen on photo scanning. In this case, pixelation basically depends on the quality of the scanner.
- Camera holding errors or positioning errors can result in pixelation or blur in the image.
- Image pixelation can happen when the images are opened on incompatible software or applications.
How to Reduce Pixelation in Photoshop?
If your photos become pixelated and if you want to fix it, you can do it with Photoshop. Photoshop results in pixelate fixing more accurately than other online and offline tools. In this description, we will learn about how to make an image less pixelated in photoshop. There are two ways that you can remove pixelation in photoshop.
First Technique
In this technique, we will reduce the pixelation by sharpening and blurring the photo. Follow the steps below:
- First, you have to open the image that you want to edit. To open the image in photoshop, go to the “FILE” menu and click “OPEN” and select the desired photo. Or, you can simply open the image by pressing “CTRL+O” from the keyboard and select the desired photo.
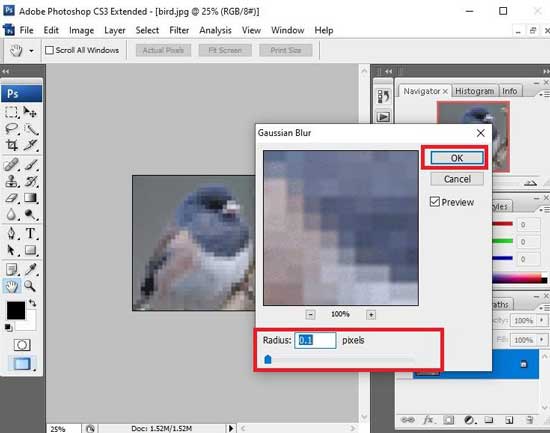
- Now, go to the “Blur” option from the “Filter” menu and select the “Gaussian Blur”

- Now, a dialog box with a slider will appear. After that, slide the slider or increase the radius value until the photo in the preview window becomes smooth. Then, click “OK.”
- Now, click on the “Filter” menu again and then go to “Sharpen” option. From the sharpen option, select the “Unsharp Mask”.
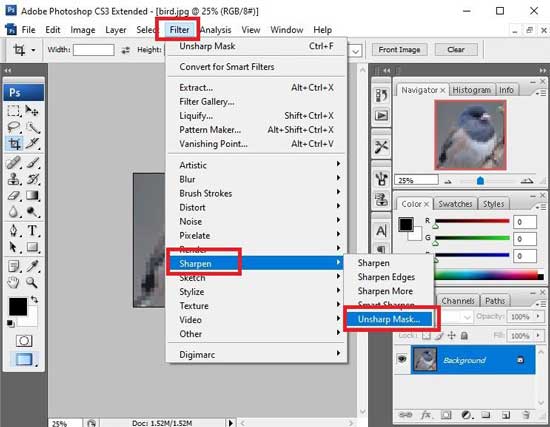
- Now, a dialog box with a slider will appear. After that, slide the slider or increase the radius value until the photo becomes acceptable. Then, click “OK.”

- When you done, save the image
Fix pixelated Image in Adobe photoshop [Second Technique]
In this technique, we will add a layer of soft light to minimize the pixels or blocks. To do this,
- First, you have to open the image which you want to edit. To open the image in photoshop, go to the “FILE” menu and click “OPEN” now select the desired photo. Or, you can simply open the image by pressing “CTRL+O” from the keyboard and select the desired photo
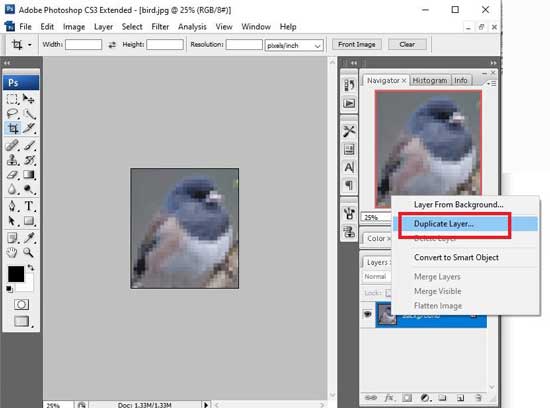
- Now, go to the “Layer” panel and right-click on the original image layer. A dropdown menu will appear, then select the “Duplicate Layer” option from the dropdown menu.
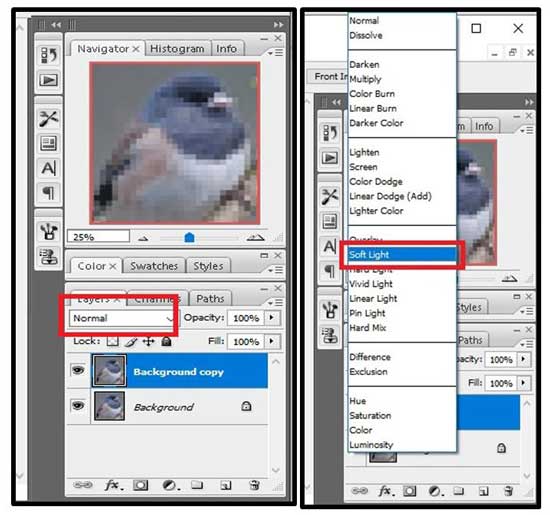
- After that, click on the “Normal” dropdown option from the layer panel. And then choose the “Soft Light” option.
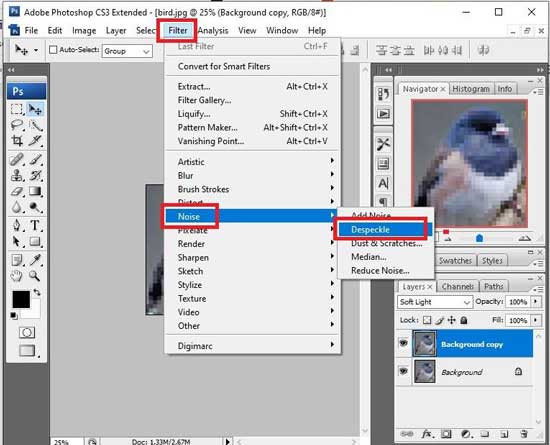
- After that, click on the “Filter” menu and then go to the “Noise” option. From the noise option, select the “Despeckle” option. Now, adjust as per your preference.
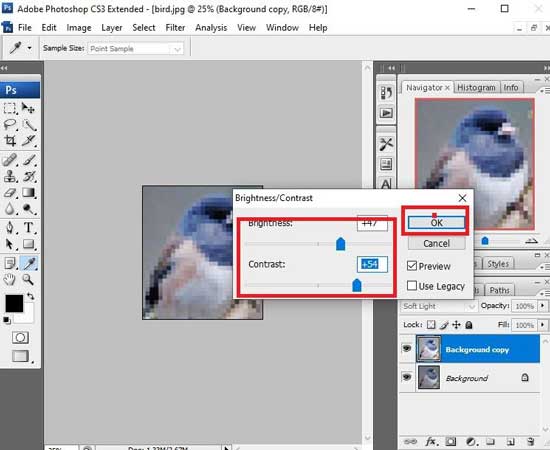
- Now, go to the “Image” menu and then go to the “Adjustments” option. From the adjustment option, choose the “Brightness/Contrast” option and make the adjustment as per your preference.

- Finally, Save the image.
Other ways to prevent pixelation
Technique 1: Prevent pixelation at the beginning
An image becomes pixelated when the image is enlarged too much or stretched in a strange direction without giving attention to the image’s original size. So, you have to be careful when resizing the photo in photoshop. You can convert the image into a smart object to make it remain unpixelated.
Technique 2: Editing the image with the Sharpening Program
There are few photo sharpening programs available like Focus magic, Nik Sharpener Pro by DxO, etc. These programs are not that much perfect, but they are comparatively good options to sharpen a photo automatically.
Technique 3: Fix Pixelated images from Online
There are many image editing tools available online. They can do the editing without wasting any time, most of them are free of cost. You do not have to go through any download or installation process. You just have to upload the photo and just follow their steps.
Fotor is an excellent photo editing website to fix the pixelation. Apart from that it offers a wide range of editing services. Follow the instructions to fix the pixelated images.
- Go to Fotor website and upload your image.
- Select the “Effect” option from left menu.
- Now, navigate and select the “Pixelate” option.
- After that, move the pixel size slider to the left and minimize the pixel size.
Technique 4: Fix Pixelated photos with Paint.net
Paint.net is another alternative to photo editing. This can be used for removing the photo pixelation. Here are the instructions to fix the pixelated images.
- Open the image with Paint.net.
- Next, go to the “Effects” option and then go to the “Blur” option and select on the “Gaussian Blur”.
- Now, move the slider to reduce the pixel effect.
- After that, go to the “Effects” option again and then go to the “Blur” option and select the “Photo” option and select on “Sharpen”.
- And then, move the slider until you get the appropriate result and save the image.
Technique 5: Fixing the Pixelation by Pixelate
This online tool is slightly different from fotor. Follow the steps below:
- First, upload the photo to the website.
- On the left side menu, select the “Smooth Photo” option
- After that, the pixelation of your photo will be automatically reduced.
Tips: Before starting any kind of editing, make sure that you have the backup of the original photo to be risk-free. Unless, you may not have any option left to recover if any error occurred in editing the photo.
If you are on the way to hire a professional for your photo editing, give them your clear instruction about what you want for your photo.
Conclusion
Pixelation of images is very troublesome to deal with. A great picture can become poor quality. But, the good news is, there are techniques and tools that are able to improve the quality of the pixelated image. Above we have tried to show various techniques of removing the image pixelation. You can easily do those by yourself at home.
Hopefully, in this article, we are able to give you ideas to enhance pixelated image photoshop. There are various options available, but the most powerful tool to fix pixelation is Adobe photoshop. Use Photoshop actions to enhance the low-resolution images with a few steps.